

Listeners:
Top listeners:
00:00
00:00
volume_up
chevron_left
-
 play_arrow
LHD Radio LHD Radio
aisha maneus
 Coupé Cloué - Yeye
Please play yeye coupe cloue for lovely dady Jean Maneus the best dad ever
Josephine
Coupé Cloué - Yeye
Please play yeye coupe cloue for lovely dady Jean Maneus the best dad ever
Josephine
 Boukman Eksperyans - Ke M Pa Sote
Dialogue Avec Jean Maneus se nouvo rendez vou'm sou Radio LHD. Kembe Fo! Haitian Canada yo Avek ou.
Elie Murad
please can play webercicot
Didi
Boukman Eksperyans - Ke M Pa Sote
Dialogue Avec Jean Maneus se nouvo rendez vou'm sou Radio LHD. Kembe Fo! Haitian Canada yo Avek ou.
Elie Murad
please can play webercicot
Didi
 Michel Martelly - I Don't Care
Love this station!!
Michel Martelly - I Don't Care
Love this station!!

Kompa Groove Rewind
Weekdays & Weekend Mix
access_time7:30 am - 5:00 pm
We are glad that you want to become a host. First, let’s see if your equipment is ready to broadcast on our radio station. Here’s what you will need:
Windows Based Computer [ ]
A Stable High Speed Internet [ ]
A Microphone [ ]
A Headset [ ]
Rocket Broadcaster software [ ]
Our Radio Server’s Address:
Connection Information
Icecast Clients
Server:
https://stream.lhdradio.comPort:
8005Mount Name:
/
Shoutcast Clients
Server:
https://stream.lhdradio.comPort:
8005For some clients, use port:
8006Password:
dj_username:dj_passwordordj_username,dj_passwordFor example: if your username is jsmith and your password is jacmel24$ , you will enter either jsmith:jacmel24$ OR jsmith,jacmel24$
Your user name will be provided by the radio program manager.
Next, you’ll need to download a free copy of Rocket Broadcaster by clicking here. Once dowloaded, you’ll need to install the software unto your computer.
Once installed, you will need to follow this guide if you’ve never used Rocket Broadcaster or Shoutcast/Icecast Client before:
Rocket Broadcaster is a streaming audio encoder that takes audio from a microphone or line-in device, compresses it, and streams it out to the internet via a streaming server. This page will explain the basic process of configuring Rocket Broadcaster so you can start streaming.
Prerequisites
Before you begin configuring Rocket Broadcaster, ensure you have the following:
Rocket Broadcaster or Rocket Broadcaster Pro installed on your PC
An audio playback device in Windows (a soundcard or onboard audio)
A microphone, or something plugged in to a line-in jack on your soundcard.
Step 1. Configure your soundcard
The first step in setting up Rocket Broadcaster is to configure your soundcard in the Preferences window. You can find this in Rocket Broadcaster by clicking Options->Preferences in the menu at the top of the main window.
Ensure you have a valid audio playback device selected, with a valid samplerate. If any of the fields are blank, you must change them to valid options.
Preferences
This page explains the Preferences window in Rocket Broadcaster, which is mainly for configuring your soundcard and audio inputs. You can access these preferences by clicking Options->Preferences in the menu bar at the top of Rocket Broadcaster.
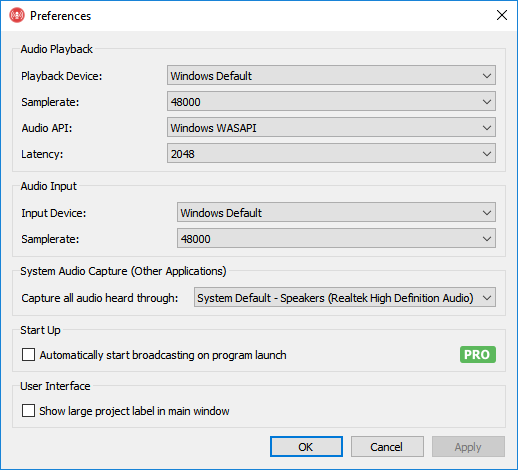
Audio Playback
Playback Device – The clock device that drives the timing of the stream output. For optimal performance, choose the same physical device as your Microphone device below. (In a future release, this device may be used for direct monitoring of the mix.)
Samplerate – The sampling rate that audio will be processed at inside Rocket Broadcaster.
Audio API – The operating system’s audio API that is used to access your sound hardware.
Available Audio APIs:
- Windows WASAPI – Offers a good balance of high performance and compatibility. (Default)
- Windows WDM-KS – Allows selection of individual channel pairs for capture. If you have a soundcard with multiple inputs, this option will allow you to choose a specific input channel pair in the Microphone selection box below.
Latency – The audio buffer size (in samples) processed each clock period. (Default: 2048) On very slow CPUs, increasing this can reduce the chance of audio dropouts. Most users should leave this setting unchanged.
Audio Input
Rocket Broadcaster can capture external audio from a microphone device or a soundcard’s line-in jack. This section configures that input device.
Input Device – The microphone or line-in device to capture audio from.
Samplerate – The samplerate for the Microphone capture device.
System Audio Capture (Other Applications)
Rocket Broadcaster can capture “what you hear” being played through your speakers or headphones, and encode that to your stream.
Capture all audio heard through – The playback device to siphon audio from. Any audio that is normally played through this device will get captured into the second mixer channel in Rocket.
Start up
Automatically start broadcasting on program launch – This automatically starts broadcasting to your streams when Rocket Broadcaster is launched. (The last broadcast project saved is always automatically loaded.) Enabling this option is recommended if Rocket Broadcaster is running unattended.
User Interface
Show large project label in main window – Displays an easy-to-see label with the project filename in the main window. If you’re running multiple Rocket Broadcaster instances, this can make it easier to identify which one is which.
Step 2. Ensure audio is working
The next step is to return to the main window and ensure the VU meters move when there’s sound coming through your input device. Both the microphone VU meter should move as well as the master VU meter. If the master VU meter doesn’t move, then there is a problem with the Playback Device selected in the preferences, and you should try choosing a different one.
Step 3. Configure your stream
Next, you need to give Rocket Broadcaster the connection details and credentials for the streaming server you wish to stream to. (Rocket Broadcaster supports multiple output streams, but we recommend getting the first one working correctly first before you add more.)
Open the Streams window by clicking Broadcast->Streams… from the menu at the top of the main Rocket Broadcaster window. In this window, you can create and customize output streams. Enter the streaming credentials and connection details given to you by your stream hosting provider. If you don’t know these, please contact your streaming provider or system administrator.
Streams
This page explains the Streams window Rocket Broadcaster. You can access it by clicking Broadcast->Streams in the menu bar at the top of Rocket Broadcaster.
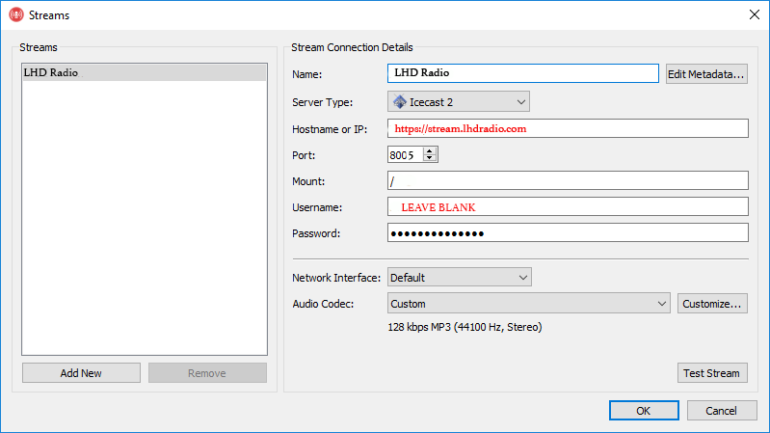
The Streams window contains all the settings for your output streams, including which server to stream to, and how to encode the streams.
Stream Connection Details
This information is typically given to you by your stream hosting company. If you’re hosting your own streaming server, this information will come from your streaming server’s config file.
Name – A nickname for the stream. With Icecast 2 and Shoutcast, this is used as the ICY-NAME metadata field, which is visible as the stream name to listeners in some players.
Server Type – Specifies the protocol used to stream to your streaming server.
Available Server Types:
- Icecast 2
- Icecast 2 (SSL) – Uses SSL/TLS to securely encrypt the streaming connection to the server. (As of 2018, still not supported by most streaming providers, unfortunately.) Available ciphers depends on your system.
- Shoutcast 1 (Legacy) – Uses the original Shoutcast 1 protocol. Compatible with Shoutcast 1 servers. Does not support specifying a DJ Name or Stream ID.
- Shoutcast 1 – Use an extended version of the Shoutcast 1 protocol. Only compatible with Shoutcast 2 or greater servers.
- Shoutcast 2 – Use the Ultravox 2.1 protocol to communicate with Shoutcast 2 servers. Unlocks station artwork metadata options in the Advanced… menu.
Hostname or IP – The hostname or IP address of the streaming server to connect to.
Port – The port number on which the streaming server is listening for source connections.
Mount – A path uniquely identifies your source audio on an Icecast 2 server.
Stream ID (SID) – A number that uniquely identifies your source audio on a Shoutcast 1 or 2 server. Set to 1 if you don’t have one.
Username – The login username for your source audio connection on the streaming server.
Password – The login password for your source audio connection on the streaming server.
Network Interface – The network adapter to use to connect to this stream. Most users should leave this setting at “Default”.
Audio Codec – The audio compression algorithm used to encode your stream.
Some of the above fields are only applicable depending on the Server Type, as explained in the table below:
| Field | Icecast 2 | Shoutcast (Legacy) | Shoutcast 1 | Shoutcast 2 |
|---|---|---|---|---|
| Hostname or IP | Yes | Yes | Yes | Yes |
| Port | Yes | Yes | Yes | Yes |
| Mount | Yes | No | No | No |
| Stream ID (SID) | No | No | Yes | Yes |
| Username | Yes | No | Yes | Yes (DJ Username) |
| Password | Yes | Yes | Yes | Yes |
Advanced
There are two other useful buttons in this window:
Edit Metadata – Shows a window with several extra metadata fields that can be set on a per-stream basis. These fields are static metadata that’s sent only when the stream connects, and cannot be changed without restarting a stream:
- Genre – The genre of your radio stream
- Description – A short description your stream
- Website URL – The homepage of your radio station
- Private stream – Check this box to prevent some streaming servers from publishing your stream to a public stream directory website.
Audio Codec – Customize – Allows you to choose specific encoder settings instead of using one of the presets. The available settings are:
- Codec – The compression scheme used to encode your streaming audio.
- Bitrate – The amount of bandwidth that the audio will use (kilobits per second, or kbps). Higher means better quality audio, but more bandwidth is required.
- Channels – The number of audio channels the streaming audio will use. (Stereo or mono.) This is independent of your soundcard input. If you’re capturing stereo audio but choose Mono here, the audio will be downmixed to mono before encoding.
- Samplerate – The number of audio samples per second to be encoded. This is also independent of your audio input settings. If your stream has a different samplerate than your input audio, your stream audio will be automatically resampled to this value before encoding.
Stream Diagnostic
The Test Stream button initiates a short diagnostic test of the stream details you have entered. The test does the following:
- Basic internet connectivity is tested to ensure your PC is connected to the internet.
- A DNS lookup of your server hostname is performed to ensure DNS is working.
- Your streaming server is pinged to validate your server hostname / IP.
- A connection to your streaming server is attempted to make sure the streaming server software is running on the specified port.
- An attempt to authenticate with your streaming server is made to validate your username and password.
If any of the tests fail, the Stream Diagnostic window will provide some troubleshooting tips. Please see those tips for more details.
Once complete, click OK and return to the main Rocket Broadcaster window.
Step 4. Test your stream
In the main window, try starting your stream by clicking Start Broadcast. If everything worked, you’ll see “On Air”. If there was a problem, you’ll receive an error message. The most common problem is a typo when entering your stream settings, so it’s good to double check those.
Step 5. Configure metadata
If you’re capturing audio from a radio automation system or some other audio player software, Rocket Broadcast can capture track metadata from that application so that your listeners can see the artist and title of the song you’re playing.
Metadata can be configured by clicking Broadcast->Metadata Capture in the menu at the top of the main window. The specific settings you’ll need are different for every application, and are beyond the scope of this document.
And, that’s all there is to it! Happy Broadcast!!
-
-
 play_arrow
VOYE DLO (feat. Jessie Woo & Eddy Francois) Wyclef Jean
-
-
-
 play_arrow
Blackout (Live) Klass Live
-
